Wednesday, December 28, 2011

Snowman Freebies!

Today is the first day of the break I have given thought to what I'm going to do when I get back in the classroom! Our first week back is, of course, winter-themed. I will begin addition with my kiddos in January, so I created a "Draw a Snowman" activity. The kiddos love doing these. It's available for free in my TN shop, click here!


I also wanted to share a wonderful emergent reader freebie I found at CanDoKinders. She is so sweet to share this - the kiddos dress their own snowman as they read along. 

Tuesday, December 6, 2011

Nutcrackers and Target Love and Trees


I am in love with these nutcrackers! I did a drawing lesson following the directions from the amazing blog, artprojectsforkids.org. She has a whole Nutcracker Series. The kids then traced pencil lines with sharpie (one with reluctance... "but Miss Brooooowwwn, I'm not allowed to use sharpies!" Her parents have trained her well)! After sharpie tracing, they erased any pencil lines that were left over. We used my shiny tempera paint for big parts and cray pas for face, beard, hair, eyes. This project followed a reading and discussion of The Nutcracker, listening to the music and attending a puppet show version at the Dallas Children's Theater.

Have I mentioned that I LOVE the Target dollar section? There is so much inspiration to be had on those shelves. So, my latest finds are these cute, plastic Christmas-themed jars and these packs of tiny plastic ornaments! Each item is only $1 so that even a poor private-school teacher can have fun stuff in the classroom! Here is how I am using both in the classroom:


I got one of each jar - trees, gifts and gingerbreads. I filled each with different amounts of candy canes. This is going to be a station this week in which the sweeties estimate how many candy canes in each jar, then count them. I created this response page to go with the center (that you can download for free here).


As for the ornaments, I will use them along with my Christmas Math (on sale in TN) sorting mat and graphing page. The kiddos will first sort the ornaments by color. Then, they decide how to share each color equally among two trees. They will record their findings on the response sheet.


One of my fellow Kinder teachers came up with this cute project. The kiddos trace three different sized hearts and cut out from anything you choose. My colleague used fabric, I used wrapping paper and scrapbook paper. For those of you in a Christian setting, there is a sweet poem that goes with it.


One more precious idea I want to share tonight and then I'm calling it quits for the evening! I got this idea from Pinterest - a mom wraps 24 Christmas books (that she already has) every year and puts them under her child's tree. The child gets to unwrap one to read at bedtime each night as a sort of Advent calendar. I adapted this for my classroom. 15 days of school until Christmas break, 15 kids in the class, 15 books under the tree, 15 names on the tree. Every day I choose a different child to take his or her name off the tree and unwrap a book to be read during snack. It is a great incentive for good behavior and they are always so excited to see what we be unwrapped!

Sunday, November 27, 2011

Math for December - Freebie!

Gingerbread math journals are free to my faithful followers! Please comment if you download them =)


I also just added my Christmas math to TN. 


Since I am so new to the game, please remember I always love to hear from you! 

Friday, November 25, 2011

Christmas Word Sorts almost Free!

I have been playing with my new Christmas digital stamps and found that these trees were just begging to be made into sorting activities. I lack the license (for now) to give them away for free, so I put them in my shop for a whopping 10 cents! I'd be glad to customize the word family or sounds pages for you!


Stay tuned, I have been working on a Christmas math pack that has me quite excited!

Thursday, November 24, 2011

But I am NOT thankful for...


Okay, my first linky party! How fun! Because we are trained teachers, I'm going to follow protocol here. I'm going to start with a positive, offer two things for which I'm not thankful, and end on a high note!

1. I am so thankful for my job and [mostly] everything that comes along with it - colleagues to laugh and joke with about the happenings of our crazy days, children with no two personalities the same, hugs and band-aids and learning, creativity and organization. I love it!

2.  I am so thankful for coffee. It warms me up on the inside and the outside. One sip of a pumpkin spice latte and I know that fall is here! 

3. I am not thankful for traffic on the way home from school. I like to stay after school and work, but some days the thought of being stuck in 5:00 traffic in Dallas trumps my need to label clothespins with letters or organize that drawer that has been bugging me. 

4. I am not thankful for painted cinder block walls and a "blue painter's tape only" rule. My word family posters fall down at least once a week because that blue tape just won't stick! However, we are not allowed to use anything thing else on the walls. Do you think teachers at my school are more interested in following that rule or having posters that stay up? We'll keep that to ourselves. 

5. I am thankful for coming home after a long [but fulfilling and wonderful] day of work to my four-legged children. Licks, licks, licks all around! I will take this opportunity to brag: 


6. I am thankful for all of you blogging teachers! You have inspired me in major ways and make me such a better teacher! Thank you so much for having sharing hearts and a passion for what you do. 


Isn't it great to rant and rave!? Link up here!

Saturday, November 19, 2011

Texas Unit

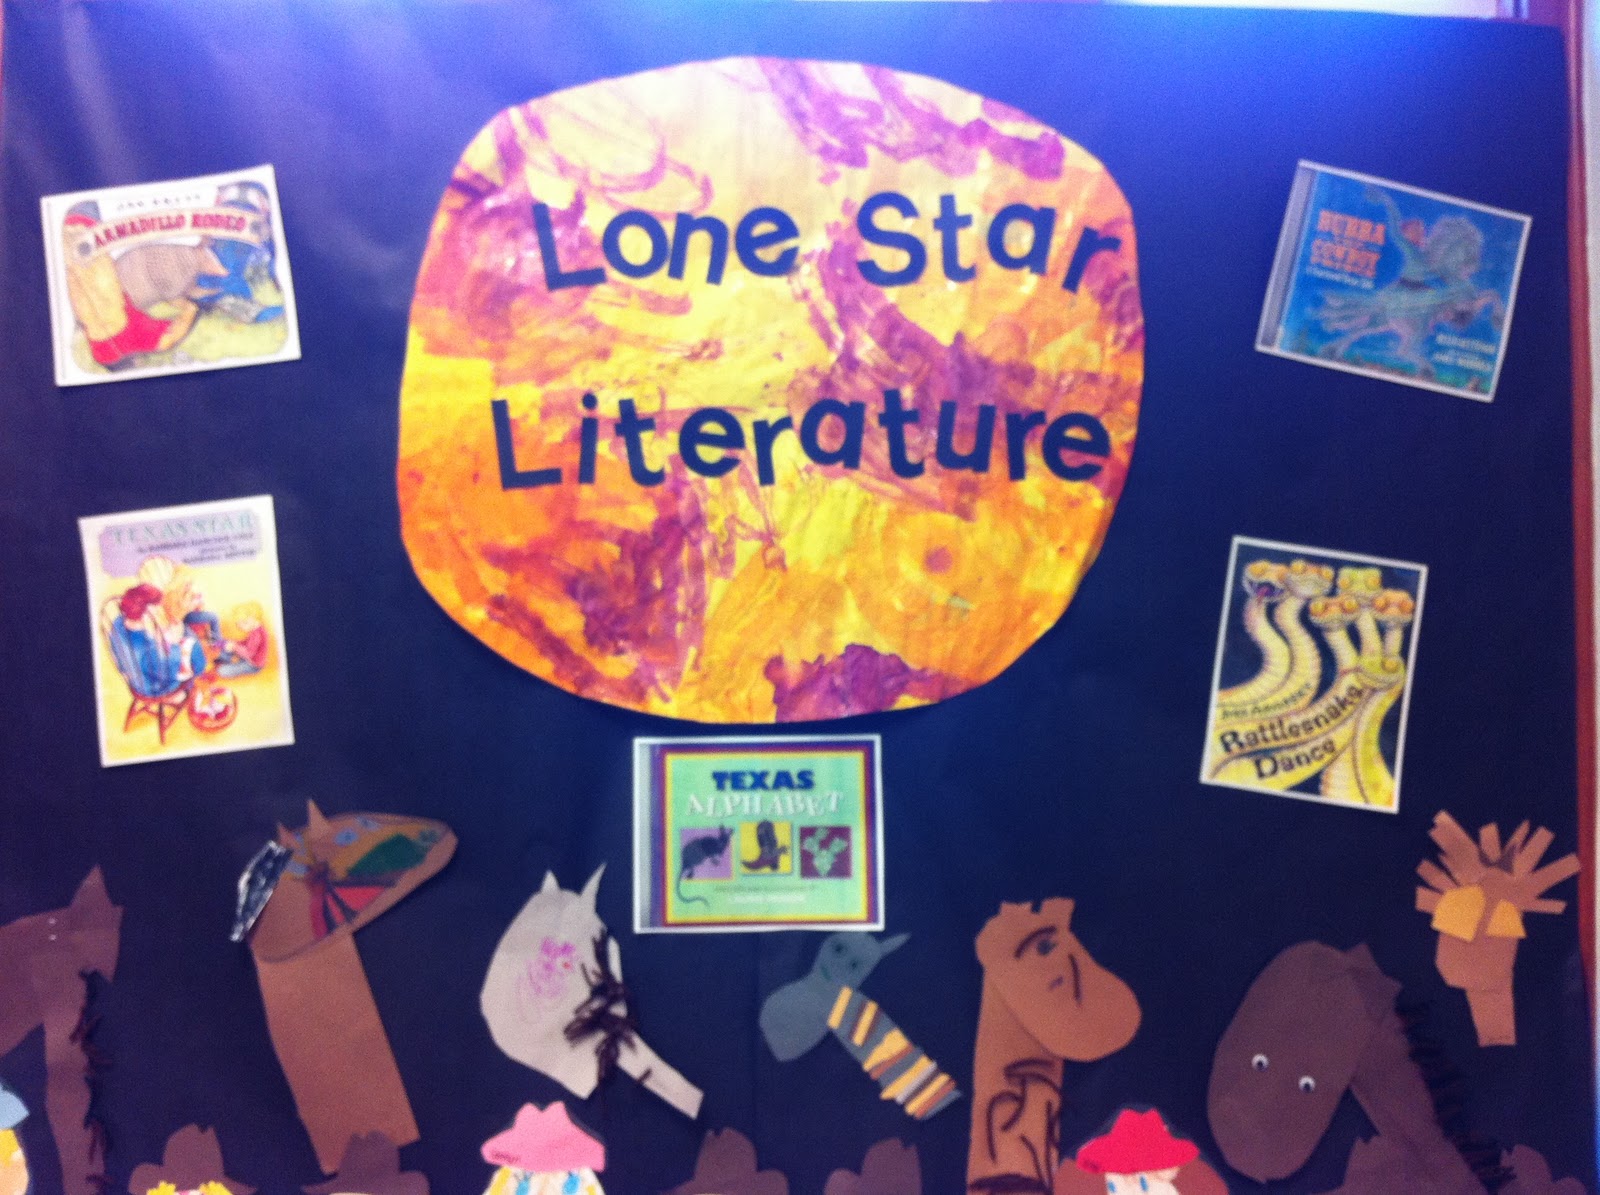
Every year, my school continues the (much-loved) stereotype that Texas is a state of desert-dwelling cowboys and cowgirls by hosting a Dad's Night with a western/fall/Texas theme. All of the teachers are responsible for putting up a fabulous display in the halls and were also required to have a 3-D scarecrow outside their room. The Kinder team decided on our own little theme for our hall display, appropriately titled "Lone Star Literature." We based all of our projects on some fabulous children's books.


We read Rattlesnake Dance and made rattlesnakes, Bubba the Cowboy Prince (a fun twist on the Cinderella story) and made cowboys and horses, and Armadillo Rodeo and made armadillos. We learned about several Texas symbols and made Texas flags and bluebonnets after reading Texas Alphabet and L is for Lone Star.

              
imgres.jpg      bookdetail.asp.jpg      
bubba_cowboy_prince_lg.gif      


There are so many great books out there about Texas! 


The snakes were made from a paper plate. the kiddos painted them, then cut in a spiral. They made a pattern using die cut rhombi. Rattles were made using pony beads or beans. Armadillos were simply made out of two shades of gray construction paper. Each class's armadillos were slightly different. My babies used texture brushes and black paint to decorate the shell. Another class painted them with a glittery black. The ideas for the snake and armadillos came from April Larremore's  AMAZING Texas Unit. 


Our horses were peeking their heads out of the fence! These were made without patterns by taking the students step-by-step. They were asked to cut out an oval, rectangle and two triangles. The manes were made using cut yarn. My two fellow kinder teachers did this as strictly following oral directions, I chose to demonstrate each step (thus the difference in horsey appearances)! 


Cowboys and Cowgirls in my class were made with die-cut boots and hats, patterns for shirts and pants, and the rest was up to the kinders. I gave them glittery horseshoes and stars to use as belt buckles and scrapbook paper for the shirts and blue construction paper for the jeans. Another class made "rhinestone" cowboys by adding some bling for the belts! 


Finally, we made torn paper texas flags with die-cut stars and fingerpainted bluebonnets. 


We divided up major display components, and my class made the cacti. We traced around the kids on green butcher paper, finger painted with green tempera to make the "texture" and added toothpick spines. 


We made these lovely desert sunsets by using liquid water color and adding a black construction paper cactus.


In centers, students made word family bluebonnets using strips of green paper, die-cut blue circles and white colored pencils. They wrote sentences about Texas using our sight word is on this scaffolded page. I will put this page in my Teacher's notebook shop as soon as I can find it... it is lost in Mac world. I really need to go take my classes at Apple on how to use my computer! 


I cut strips of blue, red and pink felt and the kids made hat bands using foam stickers. I got the hats for $1.29 each from US TOY/Constructive Playthings. 


It is part of the Dad's Night tradition for the kids to make veggie soup following a trip to the Farmer's Market. Parent volunteers come in to help the kiddos wash and prep the veggies. This poem, Mix the Soup, from Scholastic's Sight Word Poetry Pages, was perfect for the week. 


Finally, this brings us to how I made my 3-D scarecrow.... 


My dear sweet father came in for Dad's Night, and together we became living scarecrows! My kids looked at me that night  like they didn't know who I was!


Wow! What a unit.... now on to Christmas! 


Best Practices in Curriculum and Instruction

I so much enjoyed my first graduate class - Curriculum Design and Evaluation, and want to share some of the big ideas I took from the course.

  •  Do more with less!
What do I mean? Go deeper.

Ideas:

Read one book several times over the course of a few weeks, as opposed to reading it once and moving on to something else. Explore the book inside and out. Retell it in various ways. Discuss it, respond to it, analyze it. Develop a rich experience rather than a superficial one. The students will be engaged in higher order thinking skills and will remember the content.  

Instead of providing several practice problems, provide a few meaningful ones. One word problem in which students have to read, choose a strategy for solving, choose the correct operation, solve the problem and show how they came to their solution tells you a lot more about a child's thinking than a worksheet full of addition problems. 

  • Do not rely solely on published materials!
Why? Although publishers will often claim to "meet the Texas standards," they are not designed solely for Texas. Nor are they designed solely for any one state. With the exception of very few published curriculums (such as CSCOPE), purchased materials may include your state's standards, but ALSO include standards from other states. For example, Texas materials also include Florida, New York and California standards. 

What to do instead:

Based on the wonderful research model of Margaret Kilgo, (if you don't know her, research her!) follow these steps:
1. Identify the goal/objective/standard/student expectation.
2. Identify the verbs to indicate the depth of thinking or doing expected from the student.
3. Identify the nouns for the level of complexity of the concepts.
4. Identify the vocabulary expected to be understood.
5. Ensure the lesson you teach and the practice opportunities meet the student expectation! 

Tuesday, October 25, 2011

More Centers!

You know your centers are a success when centers time is so quiet! The children have been so engaged this week and are working together very nicely. Here are a couple of the things we are doing:


For this center, I took two large foam dice and covered each side with a sticky label. On the red, I put the two vowels we have been practicing, and the blue die has the consonants we have working on. I LOVE using dice because the precious ones love them! So, they roll a consonant, roll a vowel, and then choose a letter from the box on their page to make a word! Here is the page (available at my Teacher's Notebook shop)


Another center we are doing is the tried and true playdough word tracing for our sight word centers. I ask mine to roll out the dough into "snakes" to use as lines when forming the words, as opposed to just smashing the dough down in any old way. This helps them see how the letter is formed. 


I'll keep 'em coming! 

Tuesday, October 18, 2011

Centers, Centers, Centers!

Centers time can be so much fun! Thank you, blogging teachers, for sharing such great centers ideas. I wanted to give back a little bit by sharing a couple of my favorite recent centers and adding a freebie! Here we grow....


Here's the freebie! It is a sight word graphing page. I have seen this idea other places... I know Moffat Girls has a very cute version, but I needed to make my own to meet the needs of my little learners! The children were so excited to see which word would "win!"
Download the graph by going to my shop on Teacher's notebook.


I printed these pattern block numbers from makinglearningfun.com and they were a hit! They were such a great way to begin our journey into number formation. For a follow up, visit my shop for the still free numbers formation book!


Meeting the TEKS:

Sight Word Center
110.11. English Language Arts and Reading
  • K.3.D identify and read at least 25 high-frequency words from a commonly used list
Math Center
111.12 Mathematics
  • K.1.C use numbers to describe how many objects are in a set (through 20) using verbal and symbolic descriptions


Thursday, October 13, 2011

Painted Pumpkins


These are actually from last year, but I plan to do them again! The kids painted a white layer over their whole pumpkin (we used tempera because it was available, but an acrylic paint would be even better to prevent chipping later). The next day the children chose from several fall colors to add decorative handprints. We took some really cute fall photos with our pumpkins that were adorable on our Thanksgiving place mats.

Sunday, October 9, 2011

Thanksgiving Numbers!

I can't wait to use these numbers come November! Our K math will be heavy into numeration at that time and I am already planning all of the fun math centers I can create. As soon as I have the corresponding worksheets made I will add those to the store. For now, I have plenty of printing and cutting to do!

Labeling and All About Me

Last week our theme was All About Me - which lent itself perfectly to our writing concept, labeling.


Students created q-tip skeletons and labeled four major bones using a white colored pencil. 


They also colored, cut out and glued 4 major organs onto a body and labeled the organs. The right side of the lung is not glued down, so you can lift up and reveal the heart! Each organ has a kid-friendly description of its function. 


In centers, students practiced labeling (and, of course, inventive spelling) independently with laminated illustrations and wet erase markers. This was the favorite center last week. The kids loved writing on the pages with the markers and loved using the spray bottle of water for cleaning them off even more! I also loved how they were so fearless in using inventive spelling in this setting compared to writing with pencil and paper at the tables. 

Meeting the TEKS:

110.11 English Language Arts and Reading
  • K.15 Students write expository and procedural or work-related texts to communicate ideas and information to specific audiences for specific purposes.
  • K.18.A Use phonological knowledge to match sounds to letters

Tuesday, October 4, 2011

Pumpkin Parts

I just love these adorable pumpkins we made to celebrate the coming of fall! After learning about the life cycle of a pumpkin and discussing the pumpkin parts (stem, shell, seeds and pulp), students created these cross-section pumpkins! First, we painted two sheets of paper - one orange, one yellow. The next day, the students cut out a large orange pumpkin shape for the shell and a smaller yellow pumpkin shape for the inside. They used bits of orange string for the pulp and real pumpkin seeds. Brown construction paper stems completed the project!


Meeting the TEKS:

112.11 Science 
  • K.10.B identify parts of plants such as roots, stem, and leaves...
  • K.10.D observe changes that are part of a simple life cycle of a plant: seed, seedling, plant, flower, and fruit.


Monday, October 3, 2011

Healthy Habits

Healthy Habits


    My kids had fun searching through grocery store circulars and magazines to make a plate full of healthy foods!

    Meeting the TEKS:

    115.2. Health Education:
    • K.1.B Identify types of food that help the body grow such as healthy breakfast foods and snacks
    • K.3.B Plan a healthy meal and/or snack

    Sunday, October 2, 2011

    Free Item!

    Please visit my Teacher's Notebook shop to download this free Number Formation Book!

    My First Blog!


    I chose to begin my blogging experience with this photograph of when I was moving into my first classroom, because it sums up how I am feeling about setting up my blog... like a mess! When I decided it was time to join the teacher blogging world, I knew it would be no problem for me. I used to design fabulous myspace layouts with ease! Well, either times have changed or I'm out of practice, because I spent the entire day yesterday trying to figure this stuff out. I wanted to design my own look, so I came up with a theme, purchased some adorable flowers and stick kids at scrappindoodles and set out to create my page. Ten hours later, I purchased this pre-made template. It will do for now, but I'm not giving up on the layout of my dreams! Anyway, please stay tuned as I attempt to figure out how to set up my Teacher's Notebook store and learn how to add all the fun things I'd like to share!